# How to Protect Your Server? Basics of Cybersecurity
Server security is the cornerstone of a smooth-running business, startup, or even a simple website. In 99% of cases, issues on client servers occur due to hacking, which, in turn, stems from insufficient server security.
In this article, we’ll explore the most effective methods for securing your server. Starting with the basics and moving toward advanced protection, the guide is primarily aimed at beginners. However, even seasoned system administrators can use it as a handy checklist.
{% hint style="success" %}
Each instruction is simplified to the maximum. Even if you're connecting to a server for the first time, don't worry — you'll manage!
{% endhint %}
## Linux (Basic Configuration)
{% hint style="warning" %}
Note that, by default, the sudo command may not run on Debian OS. You may need to install the sudo package using the command `apt install sudo` or simply remove sudo from the commands you use.
Before starting, use the command `sudo apt install nano` (Ubuntu / Debian) or `yum install nano` (CentOS) to ensure that the nano utility is indeed available on your system.
{% endhint %}
### Regular system updates
This is the foundation, a key measure for ensuring security on any server. If a vulnerability is discovered in the system, be the first to update to fix the problem. Just one command significantly minimizes the risk of your system being hacked.
{% tabs %}
{% tab title="Ubuntu / Debian" %}
sudo apt update && sudo apt upgrade -y
{% endtab %}
{% tab title="CentOS" %}
sudo yum update -y
{% endtab %}
{% endtabs %}
### Using SSH keys
Thanks to SSH keys, the process of password guessing becomes simply unrealistic. Imagine, there are 2\*\*2048 key combinations.
For a detailed introduction to using SSH keys and disabling server access by password, we recommend reading our articles:
{% content-ref url="../os-and-software/connecting-via-ssh-keys" %}
[connecting-via-ssh-keys](https://spacecore.gitbook.io/wiki/en/os-and-software/connecting-via-ssh-keys)
{% endcontent-ref %}
{% content-ref url="../os-and-software/disabling-password-access-to-linux" %}
[disabling-password-access-to-linux](https://spacecore.gitbook.io/wiki/en/os-and-software/disabling-password-access-to-linux)
{% endcontent-ref %}
### Changing the SSH port
Port 22, standard for SSH, has long become a target for attackers. Scanners and bots continuously "scan" the internet for servers open on this port. Their task is to find an accessible server and then start password brute-forcing, using a huge database of simple and popular combinations.
The result? Even if your server is protected, its logs will still be filled with a huge number of messages about unsuccessful connections, which can complicate the analysis of real threats. Changing the port significantly reduces this "noise" and makes your server less visible to such attacks.
A simple solution is to change port 22 to a non-standard one, any you like. For example, 50321.
First, check that the port you want to use is not occupied by any other application. To do this, use the netstat utility. Make sure the net-tools package is installed.
{% tabs %}
{% tab title="Ubuntu / Debian" %}
sudo apt install net-tools -y
{% endtab %}
{% tab title="CentOS" %}
sudo yum install net-tools -y
{% endtab %}
{% endtabs %}
Check port 50321.
{% hint style="info" %}
Note that port 50321 is just an example. If necessary, you can use any other.
{% endhint %}
```
sudo netstat -tuln | grep 50321
```
Nothing was displayed? — This means the port is not in use. We can check port 22 and see that it is indeed occupied and being used.
Go to the SSH server configuration file. Use the nano text editor
```
nano /etc/ssh/sshd_config
```
Remove the "#" in the port line and specify your desired port instead of 22. In our case — 50321. It should look like this.
Switch the keyboard layout to English and press CTRL+X, then Y, and Enter to save the file.
Restart the SSH service.
{% tabs %}
{% tab title="Ubuntu / Debian" %}
sudo systemctl restart ssh
{% endtab %}
{% tab title="CentOS" %}
sudo systemctl restart sshd
{% endtab %}
{% endtabs %}
After restarting, don't rush to close the current server window. Leave it open temporarily. If something goes wrong, you can roll back the changes.
Try connecting to the server in a new window using the specified port.
### Data backup
**At these three points, you could conclude the basic security settings. Regular updates, SSH keys, and a non-standard SSH port together have a huge effect**. Following these points will reduce the possibility of hacking by 90-95% compared to the default settings. If you are an inexperienced user and do not host ultra-confidential data on the server, this will be more than enough.
Nevertheless, you should never forget about data backups. This is a great rule that will help you not only when working with servers but also in your own projects. No hosting provider can guarantee 100% preservation of your data. There are various incidents: from simple disk failures to major incidents in the data center. Although such cases are rare, it's not worth testing your luck. Spend some time creating a backup of important data and worry no more about possible losses.
Let's deal with it in practice. For Ubuntu, Debian, CentOS OS, you can use the built-in tar utility. If it is not installed, use the command `apt install tar -y` or `yum install tar -y`
```
tar -cvzf /path/to/backup.tar.gz /path/to/folder
```
{% hint style="info" %}
/path/to/backup.tar.gz — the path and name of the archive.
/path/to/folder — the path to the folder to be archived. You can specify the name of a specific file or simply "\*" to add all folders and files from the current directory to the archive.
{% endhint %}
For example, let's archive the share folder located in the root directory /root
Make sure we are indeed in /root — `cd /root`
Use the command to archive with tar
```
tar -cvzf backup.tar.gz share
```
After archiving is complete, use the ls command to verify that the file has indeed been created.
Afterward, there are many options for handling this archive. You can upload it to your computer via sFTP or to cloud storage. Creating a manual copy once every 2 weeks will be sufficient (nevertheless, this depends on the type of your project).
You can automate archive creation via Cron and subsequent upload to external storage — even at 24-hour intervals. But this is more suitable for large-scale projects.
## Linux (for advanced users)
### Firewall configuration
We will use the Iptables utility (built into Ubuntu, Debian, CentOS). To check current rules, use:
```
sudo iptables -L -v -n
```
To avoid any issues with losing access to the server, first, explicitly allow the SSH port. Depending on which port you use for SSH, specify it in the `--dport` parameter.
In our case, we will use port 50321
```
sudo iptables -A INPUT -p tcp --dport 50321 -m conntrack --ctstate NEW,ESTABLISHED -j ACCEPT
```
Below is a list of commonly used commands in Iptables. We recommend individually considering the use of specific firewall configurations.
Block all traffic from a specific address. The `-s` argument specifies the outgoing address.
```
sudo iptables -A INPUT -s 192.168.1.100 -j DROP
```
Block incoming traffic on a specific port. The --dport argument is the blocked port.
```
sudo iptables -A INPUT -p tcp --dport 8080 -j DROP
```
To save the created rules, use the command sudo /sbin/iptables-save
```
sudo /sbin/iptables-save
```
{% hint style="success" %}
The Iptables setup process is detailed in [a separate article](https://wiki.spacecore.pro/en/network-and-security-configuration/iptables-configuration). We recommend reviewing it.
{% endhint %}
### Fail2Ban — blocking brute force attacks
This is an effective tool for enhancing server security. It monitors system service logs and automatically blocks IP addresses that make multiple unsuccessful attempts to access the server. This blocking method protects the server from brute-force password attacks and generally reduces unnecessary log entries.
**Installation**
{% tabs %}
{% tab title="Ubuntu / Debian" %}
sudo apt install fail2ban -y
{% endtab %}
{% tab title="CentOS" %}
sudo yum install epel-release -y
sudo yum install fail2ban -y
{% endtab %}
{% endtabs %}
Ensure that the Fail2Ban service is running and check its status:
```
sudo systemctl start fail2ban
sudo systemctl enable fail2ban
sudo systemctl status fail2ban
```
It is recommended not to modify the configuration files `/etc/fail2ban/fail2ban.conf` and `/etc/fail2ban/jail.conf` directly, as they may be overwritten during updates. Instead, create copies with a `.local` extension for making changes:
```
sudo cp /etc/fail2ban/jail.conf /etc/fail2ban/jail.local
```
Open the file in a text editor:
nano /etc/fail2ban/jail.local
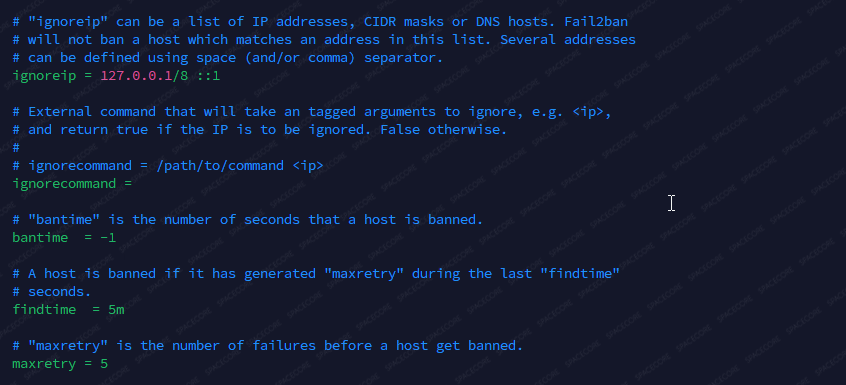
Main settings:
```
[DEFAULT]
# Ignored IP addresses (e.g., your IP).
ignoreip = 127.0.0.1/8 ::1
# IP ban duration.
bantime = 10m
# An IP address is banned if it makes "maxretry" attempts within "findtime".
findtime = 10m
# Maximum number of attempts before a ban.
maxretry = 5
```
You can set your own values. For example, stricter blocking settings can be used. Note that with these settings, offenders' addresses will be blocked permanently. This is an effective method for dealing with bots but should be used cautiously to avoid blocking trusted users.
After making changes, restart Fail2Ban:
```
sudo systemctl restart fail2ban
```
Check the debug log:
```
sudo tail -f /var/log/fail2ban.log
```
### 2FA Google — Two-Factor Authentication
Using two-factor authentication significantly enhances server security. After installation, logging into the server will first require an OTP code (updated every 30 seconds), followed by the server password. Note that you will need to have your phone each time you log in.
Install the PAM module for Google Authenticator:
{% tabs %}
{% tab title="Ubuntu / Debian" %}
sudo apt install libpam-google-authenticator
{% endtab %}
{% tab title="CentOS" %}
sudo yum install epel-release -y
sudo yum install google-authenticator -y
{% endtab %}
{% endtabs %}
Run the `google-authenticator` command as the user for whom 2FA is being configured:
```
google-authenticator
```
You will be asked the following question:
* **Do you want authentication tokens to be time-based (y/n)**: Enter `y` to use time-based one-time passwords (TOTP).
A large QR code will then appear, along with data for manual addition and recovery codes. Save these codes in a safe place as they will be needed if you lose access to the authenticator.
Download the Google Authenticator app: [Android](https://play.google.com/store/apps/details?id=com.google.android.apps.authenticator2\&hl=en) | [IOS](https://apps.apple.com/us/app/google-authenticator/id388497605)
Scan the provided code, after which the account will be added to your app.
* **Update the .google\_authenticator file (y/n)**: Enter `y` to save the settings.
* **Do you want to disallow multiple uses of the same authentication token? (y/n)**: It is recommended to enter `y`.
{% hint style="info" %}
**By default, a new OTP is generated every 30 seconds. To compensate for potential time desynchronization between the client and server, additional tokens before and after the current time are allowed. This accounts for up to 30 seconds of desynchronization.**
If you encounter issues due to poor time synchronization, you can increase the time window from the standard size (3 allowed tokens: previous, current, and next) to 17 allowed tokens (8 previous, current, and 8 next). This will allow for a desynchronization of up to 4 minutes.
— **Enter `y` to increase the time window, which can be useful for time synchronization issues.**
{% endhint %}
* **Enable rate-limiting (y/n)**: Enter `y` to limit the frequency of authentication attempts to prevent brute-force attacks.
Open the PAM configuration file for SSH:
```
sudo nano /etc/pam.d/sshd
```
Add the following line at the top of the file to indicate that the system should use the `pam_google_authenticator` module for authentication:
```
auth required pam_google_authenticator.so
```
Save and close the file. Next, open the SSH configuration file:
```
sudo nano /etc/ssh/sshd_config
```
Set the `ChallengeResponseAuthentication` parameter to `yes`. These settings enable PAM and require both a public key and a one-time password for authentication.
Save and close the file. Restart the SSH service to apply the changes:
{% tabs %}
{% tab title="Ubuntu / Debian" %}
sudo systemctl restart ssh
{% endtab %}
{% tab title="Second Tab" %}
sudo systemctl restart sshd
{% endtab %}
{% endtabs %}
Try connecting to the server. You will first be prompted for the authenticator code. Enter it.
Then, enter your server password. Connection successful!
### Antivirus ClamAV
Although Linux-based operating systems are considered more secure than Windows, using an antivirus can still be beneficial. This is particularly important when frequently exchanging files or using the server in a corporate environment. **ClamAV**, a free and open-source antivirus, can scan the system and detect viruses, trojans, spyware, and other malicious software.
**Installation**
{% tabs %}
{% tab title="Ubuntu / Debian" %}
sudo apt install clamav -y
{% endtab %}
{% tab title="CentOS" %}
sudo yum install epel-release -y
sudo yum install clamav clamav-update -y
{% endtab %}
{% endtabs %}
After installation, update the virus database. First, stop the program and then run the update command:
```
sudo systemctl stop clamav-freshclam
sudo freshclam
```
Ensure that the service is running:
```
sudo systemctl start clamav-freshclam
```
**Manual Scanning**
```
clamscan -r /путь/к/папке
```
**To scan all files on the system:**
```
sudo clamscan -r -i /
```