> For the complete documentation index, see [llms.txt](https://spacecore.gitbook.io/wiki/llms.txt). Markdown versions of documentation pages are available by appending `.md` to page URLs; this page is available as [Markdown](https://spacecore.gitbook.io/wiki/en/hetzner/how-to-install-os-with-raid.md).
# Installing the operating system
{% hint style="danger" %}
### This content is outdated
**The knowledge base has moved →** [**https://wiki.spacecore.pro/**](https://wiki.spacecore.pro/)
This wiki is no longer updated. All current guides and articles are at the new address.
{% endhint %}
{% content-ref url="" %}
{% endcontent-ref %}
***
Hetzner tools allow you to install the OS on a dedicated server in different ways, resulting in different results. Let's look at these methods in this article.
## Using Robot (RAID1)
The easiest and quickest way is to reinstall the operating system in the «Linux» section of the cloud bar [Robot](https://robot.your-server.de/).
We need to go to this section and get acquainted with the information. After that, we select the appropriate **OS** from the available images. Next, we check the box agreeing that all our data on the drives of the dedicated server will be cleared.
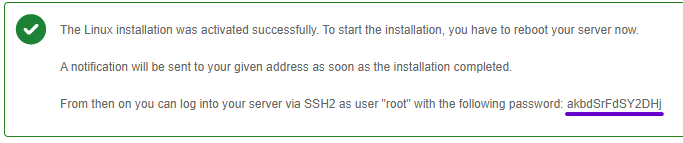
After using the «**Activate Linux installation**» button, we get something like this message:
Do not forget to copy the password generated for us, which will be assigned to the **root** user upon completion of the installation of the operating system.
Next, to start the process, restart our server using the reboot command if there is an active **SSH** connection or use the «**Execute an automatic hardware reset**» button in the «**Reset**» section of the Robot cloud control panel.
We wait a few minutes and try to connect to the server.
We see the OS we have selected installed on the cleaned drives. But at the same time, by default, we got the system on [**RAID1**](https://ru.wikipedia.org/wiki/RAID#RAID_1).
## Usage installimage (RAID 1/0/10 etc)
The install image utility is a special tool for semi-automatic **installation** of the operating system, during which basic settings such as **RAID** type, network configuration, partitioning of the system, etc. are available.
First, we need to switch our dedicated server to **System Rescue** mode. You can find how to do this in the[ corresponding](https://wiki.spacecore.pro/hetzner-robot/how-to-execut-resque) instructions.
{% hint style="warning" %}
Be sure to save the password to access the created **Rescue** session, because after the installation is completed, the password will be assigned to the user of our system using this method.
{% endhint %}
After activating the Rescue utility, we connect to our server.
Great. Now enter this command:
```
installimage
```
We expect almost instant software preparation.
In the list that opens, you need to select the Linux distribution or a custom installation image that you are interested in installing. Let's take **Ubuntu** as an example.
{% hint style="info" %}
Control in this window is performed using the arrows on the keyboard, or by double-clicking the mouse (**LMB**).
{% endhint %}
Next, select the required version of this distribution from the suggested options. Again, for example, let's choose the last available image — **Ubuntu 22.04**.
We familiarize ourselves with the information and press **Enter.**
A window opens in front of us with the configuration of the system being installed.
First of all, we should pay attention to the SW RAID and **SWRAIDLEVEL** parameters.
{% hint style="info" %}
* **SWRAID** — activating or disabling Software Raid (leaving the value 1 for the active state).
* **SWRAIDLEVEL** — determines the level of the Raid to be installed. The default value is 1, in this case RAID1 will be set. If you want to set another value available according to the parameters of your equipment, then specify the number according to the Raid type. For example, for RAID 0, this parameter should look like this (+example in the screenshot):
**`SWRAIDLEVEL 0`**
{% endhint %}
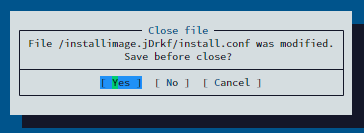
After completing the installation of all necessary parameters, press the **F10** button on the keyboard and save the changed config.
Next, we confirm the information that all existing data will be deleted from our drives.
After that, the process of installing the operating system according to the specified parameters begins. We are waiting for completion.
Upon completion of the installation, we see a similar message:
Restarting the server using the `reboot` command or the cloud control panel [Robot](https://robot.your-server.de/).
After a few minutes have passed, we connect and observe the reinstalled OS of our choice. Since we specified **RAID0** in the config for the example, our drives are now working on its basis:
## Results
Now you have learned how to install the OS on your dedicated server in **Germany** or **Finland** in two ways, each of which has its pros and cons.
The server is ready to work!